
Carmanah’s technical bulletins are intended to provide updates, clarification, and guidance on the installation and maintenance of our products. They convey relevant technical product information to our partners and customers. Please contact us if you have any questions about the content of this bulletin.
Product Applicability
This bulletin applies to the following products:
- SpeedCheck-15/18 radar speed signs, solar-powered only
- Products shipped starting 2020 Q1 that include the Morningstar SunSaver battery charge controller
Background
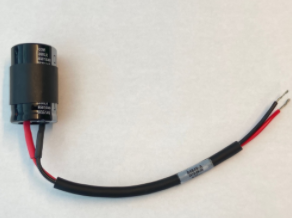
Carmanah acquired Information Display Company in October of 2018. With the transition of the SpeedCheck product line and manufacturing into Carmanah’s portfolio we changed to the Morningstar SunSaver charge controller (SS-10L-12V). After switching to this controller, we determined that a small number of users may notice the charge controller entering a protection error mode on system start up. This would be displayed on the SunSaver as a red & green simultaneous blink followed by yellow, which would repeat. This error is caused by a large capacitor inside the display (SpeedCheck-15) or on the back panel (SpeedCheck-18). The capacitor is a legacy item that was used for preventing a supply voltage drop when used with older radar units. Carmanah has removed this capacitor from current displays.
Procedure
If you have issues powering up the SpeedCheck sign display and notice the error warning on the SunSaver charge controller (with products containing the large capacitor detailed above), follow these instructions:
SpeedCheck-15:
- Remove the fuse(s) in the power cabinet.
- Gain access to the inside of the sign and open all fuse holders.
- Remove the capacitor wires from the terminal blocks and cap them off to insulate them from shorting together.
- Remove the nyloc nut and fully remove the capacitor from the system.
- Close all fuse holders and ensure battery voltage is passing through to the control board inside the SpeedCheck-15.
- Reassemble system.

SpeedCheck-18:
- Remove the fuse(s) in the power cabinet.
- Remove the four screws securing the back panel on the rear of the radar sign and open the fuse holder.
- Cut the two positive and two negative wires going into the capacitor, just before the heat shrink. Cut the wires one at a time and cap them off to insulate them from shorting together.
- Cut the zip tie (or remove the nyloc nut on legacy systems) and fully remove the capacitor from the system.
- Butt splice the positives together and then the negatives together, using a heat-shrinkable butt splice. It is advised to also put heat shrink over the butt splice for added protection.
- Wago Splicing connectors are also an acceptable alternative to butt splicing.
- Close all fuse holders and ensure battery voltage is passing through to the control board on the back panel of the SpeedCheck-18.
- Reassemble system.

Have questions? Our customer support team is always available to help.